Debts Manager Tutorial Part 3: Vert.x Web API Contract & Service
Today I’m going to bootstrap the project starting from the contract I have already created in the previous chapter. The aim of this chapter is to show you Vert.x Web, Vert.x Web API Contract and Vert.x Web API Service. The combination of these three packages provides all functionalities you need to create a REST API. Then I’m going to use pmlopes’ vertx-starter to scaffold the project.
If you are new to Vert.x, before going further I strongly suggest you to read vertx-core documentation and vertx-web documentation
Vert.x Web, API Contract and API Services
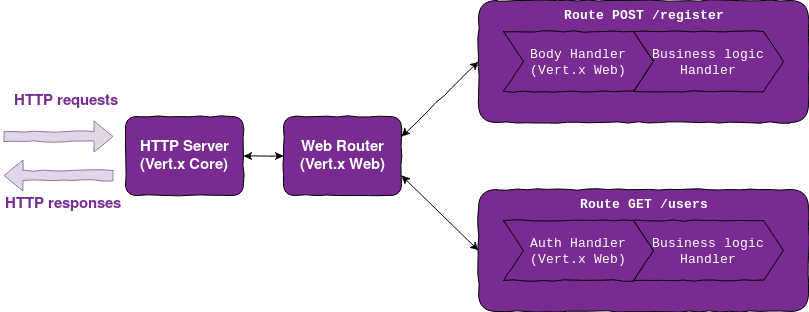
Vert.x Web is a library built on top of Vert.x to create web applications. It provides high level features like routing, request body handling, authorization, etc. The core concept of Vert.x Web is the Router which an object that can route requests to one or more Routes based on a set of rules like HTTP method, HTTP path, accepted content types, etc. On each Route you can define one or more Handlers that contain the logic to process the request. When a Router receives a request it creates a RoutingContext object which has all methods to read the request, write the response, call the next Handler and fail the context. Each Handler that you register consumes the request’s RoutingContext. Vert.x Web also provides some common handlers like the BodyHandler that parses the request body and the AuthHandler that manages authN/Z of the request

Vert.x Web API Contract generates a Router starting from an OpenAPI definition. Everything revolves around an object called RouterFactory: you create the contract, you specify to the RouterFactory what are the handlers for the defined operations and it generates the Vert.x Web Router for you. The RouterFactory does some magics behind the hood to provide you a Router that:
- Parses and validates the incoming requests (all kind of parameters and form or json bodies)
- Correctly routes the requests to the right operation handlers by generating the correct
Routeinstances - Has the required security handlers mounted in the right
Routes

Vert.x Web API Service is a code generator based on concept of Vert.x Service Proxy. An event bus service is a Java interface that helps you to define in a more natural way an event bus message consumer. This approach leads to different benefits like the straightforward process to test a message consumer like any other Java class. As every EB event consumer, a service can inhabit inside the same verticle or it can be deployed in another application somewhere else in your microservices network. You can use the Vert.x Web API Service in order to mix Contract Driven capabilites provided by Vert.x WAC and these event bus service features.
When you use EB API Services, you don’t put the business logic inside the Route handlers, but you can distribute it inside different services. Then by using Vert.x WAC, you can manage the linking between these services and the Router instance

Define the API Services
Now I need to define how to group the API Operations defined inside the contract into different API Services. An important thing to keep in mind about API Services is that, with a good design, you can turn each API Service into a microservice in a few minutes. Starting from this assumption, I want to group operations by different subdomains of my API. Debts Manager API handles users, transactions and status, so I’m going to organize operations to create a Users Service, a Transactions Service and a Status Service. Here is the mapping between services and operations:
| Transactions Service | Users Service | Status Service |
|---|---|---|
getTransactions getTransaction createTransaction updateTransaction deleteTransaction |
login register getConnectedUsers connectUser getUsers |
getUserStatus |
I need to assign an event bus address to each service. The interesting fact is that you can deploy more than one service instance on an address and the event bus will manage the load balancing between these. The event bus address could be any string in any format, although this it makes sense to use a domain like format to identify it. My choice is:
TransactionServiceis available attransactions.debts_managerUsersServiceis available atusers.debts_managerStatusServiceis available atstatus.debts_manager
Specify the services inside the spec
In order to make the RouterFactory been able to correcly link the Router to the services, it must know what are the services’ addresses. To define these associations, you have a couple of different methods. I’m going to focus on the configuration based method: inside the OpenAPI document, for each operation, I define the related service event bus address; then just calling mountServicesFromExtensions(), the RouterFactory will inspect the OpenAPI document to find all those associations. E.G. the getTransaction definition now looks like this:
1 | summary: 'Get a Transaction' |
Look at x-vertx-event-bus documentation for more details.
Bootstrap the project
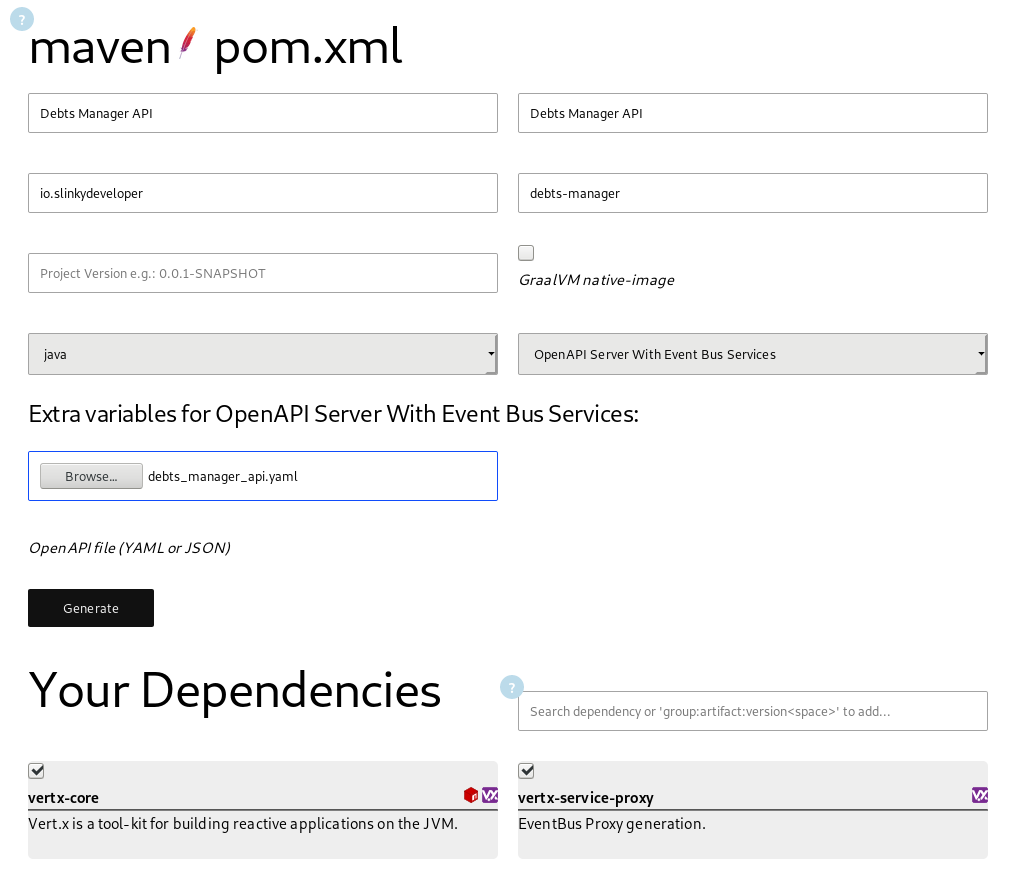
vertx-starter contains a collection of different project templates called presets. I’m going to focus on “OpenAPI Server with Event Bus” preset to scaffold debts manager.
To help the scaffolder generates the right service interfaces, you must define the service address - service name mapping. Just a couple of entries inside Debts manager API spec and you are ready to scaffold the project:
1 | components: |
Now open the vertx-starter page and with just a couple of clicks you have a zip with the project scaffolded!

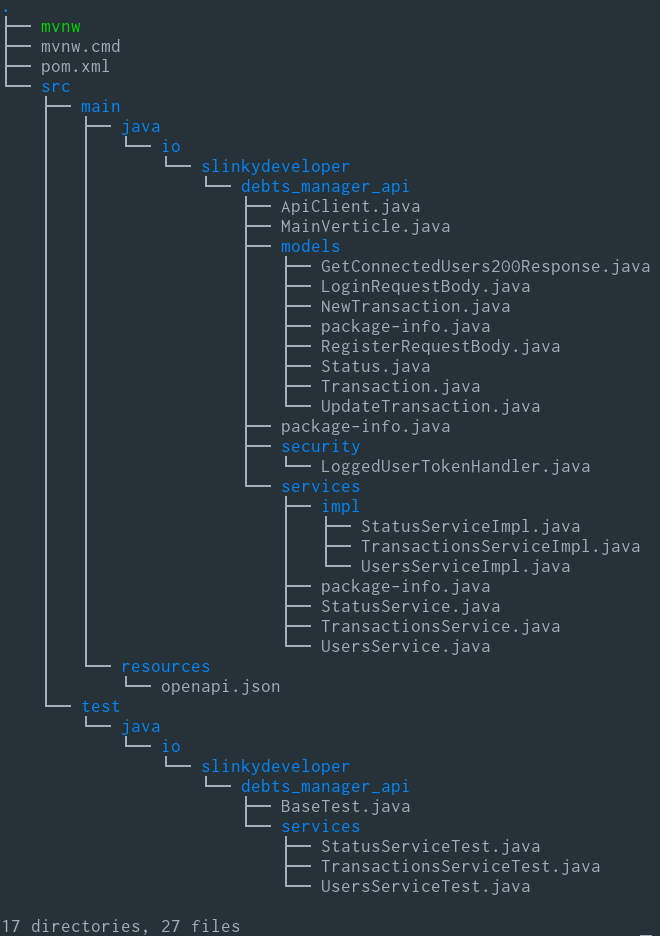
Let’s dig into the generated code:

The scaffolder created for you:
- The POJOs which represents the API data models
- The service interfaces
package-info.javafiles required to trigger Vert.x annotation processing- The stubs of service implementations
- The stubs of service tests
- The entrypoint of Vert.x application which is called
MainVerticle - An
ApiClientthat can be used for testing purposes - The build tool configuration file (
pom.xmlin my case)
As every scaffolder, it is necessary to make some adjustments for the project needs.
Configure the project
I made a couple of changes to adapt the project skeleton to my needs. In particular I configured in my pom:
- Logback logging
- Compilation with Java 11 with
maven-compiler-plugin - JUnit 5 with
maven-surefire-plugin vertx-maven-pluginto execute and package my Vert.x application
I also substituted the generated openapi.json with my original debts_manager_api.yaml to keep readibility of the spec document. The generated one is a bundled version with all $refs solved. If you need to bundle again your spec in future, I suggest you to use Speccy which is a very good tool that can also convert Json Schema to OpenAPI Schema while bundling the spec.
vertx-maven-plugin and application properties
Vert.x Maven plugin provides a couple of facilities to help you execute and package the Vert.x application. The usage is very simple: you must add it to your build plugins and then you must define the FQCN of the Verticle to run:
1 | <properties> |
1 | <plugin> |
test_config.json is a JSON containing application properties like PostgreSQL and Redis connection parameters. Vert.x Core includes this basic support to json configuration files: you can load it into your verticle with Vert.x command line, DeploymentConfig or directly with vertx-maven-plugin. If you want to configure a more complex properties management, there is a package called vertx-config that enables you to load HOCON configuration files, load configuration from a remote server, etc.
MainVerticle
The generated MainVerticle contains two methods:
startHttpServer()to create the RouterFactory, define the various handlers, generate theRouterinstance and start the HTTP serverstartServices()to instantiate and mount the event bus services
As I said before, the HTTP Server and the corresponding Router don’t depend on the event bus services, so you can move these two methods into two separate verticles. For simplicity, I’m going to mantain everything inside one verticle. In next chapters, we will spend time into splitting the verticle.
To mount a service to the event bus I use an helper object called ServiceBinder that lookups for the generated message handler and binds the service instance to the event bus:
1 | TransactionsService transactionsService = TransactionsService.create(vertx); |
As I previously said, the RouterFactory can lookup into the OpenAPI document for the associations between services and operations with mountServicesFromExtensions(). This makes the code of startHttpServer() quite simple for the moment:
1 | private Future<Void> startHttpServer() { |
Configure JWT AuthN/Z
Vert.x Web already provides a good support for JWT thanks to Vert.x Auth JWT, so I don’t need to write an handler that manages the AuthN/Z.
To get JWT running you need an RSA key pair to sign your tokens. I opted for the JWK standard to store it and I generated the key pair and the key store using mkjwk.org.
Vert.x Auth JWT provides JWTAuth auth provider, which is the object that can authenticate, authorize and generate tokens. Vert.x Web has an handler called JWTAuthHandler that uses this auth provider to validate and extract the payload of the token of incoming requests. I modify the start() method of MainVerticle to load the jwk from filesystem and create the JWTAuth:
1 | loadResource(jwkPath).setHandler(ar -> { |
And of course I modify the startHttpServer() to use JWTAuthHandler:
1 | routerFactory.addSecurityHandler("loggedUserToken", JWTAuthHandler.create(auth)); |
In next chapters you will see how to create a token during the login process.
Conclusion
The application is bootstrapped, now we are ready to deep down into application logic! In next two chapters I’m going to show you how I have implemented the persistence layer and the event sourcing layer.
Stay tuned for more updates!